... kitchens. After having two lovely dinner parties this weekend left me longing for a giant, well equipped kitchen. I love our little apartment and I love how friends pile into it to chat and sip wine together. But oh... to have a little extra room....
... fancy sea salt. I recently upgraded the olive oil I purchase. This may sound like it lacks in excitement, but the deliciousness... yummy! Now, I am tempted to upgrade my salt purchase. In a recent Cook's magazine they recommended these salts, I let you know if I give them a try.
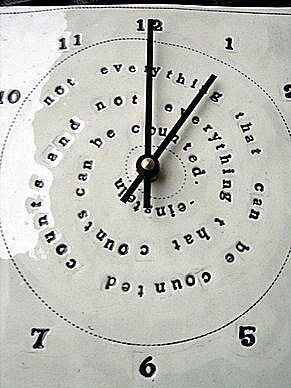
... a clock that actually resides on the wall. Currently my clocks main function is making coffee and is a little challenging to read in the dark. I love these ceramic clocks engraved with quotes by mbartstudio.
... a food processor. I tried to make soup once that called for a food processor, but I was convinced that I could use a blender. I was wrong. Now that I am trying new recipes, many of which call for a food processor, I question the effectiveness of a replacement.
... mild chili threads. Have you ever heard of these? I certainly hadn't, until now. These can add a little heat to a soup, salad, or stir-fry. Not to mention how pretty they look as a garnish.
Monday, March 28, 2011


Wednesday, March 23, 2011
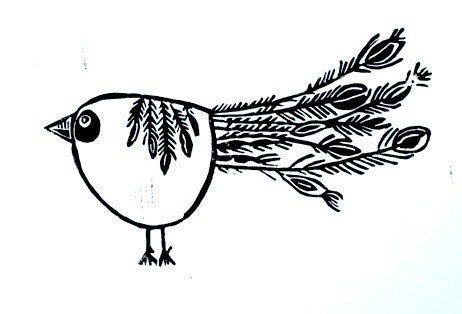
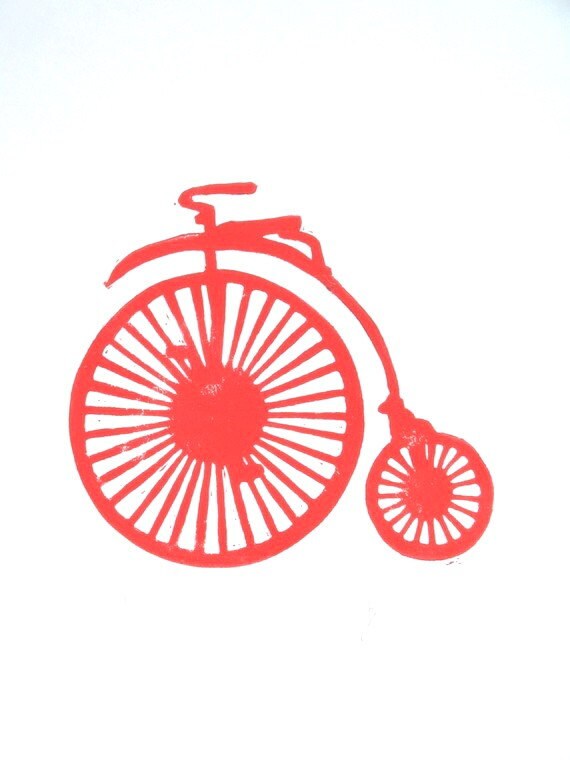
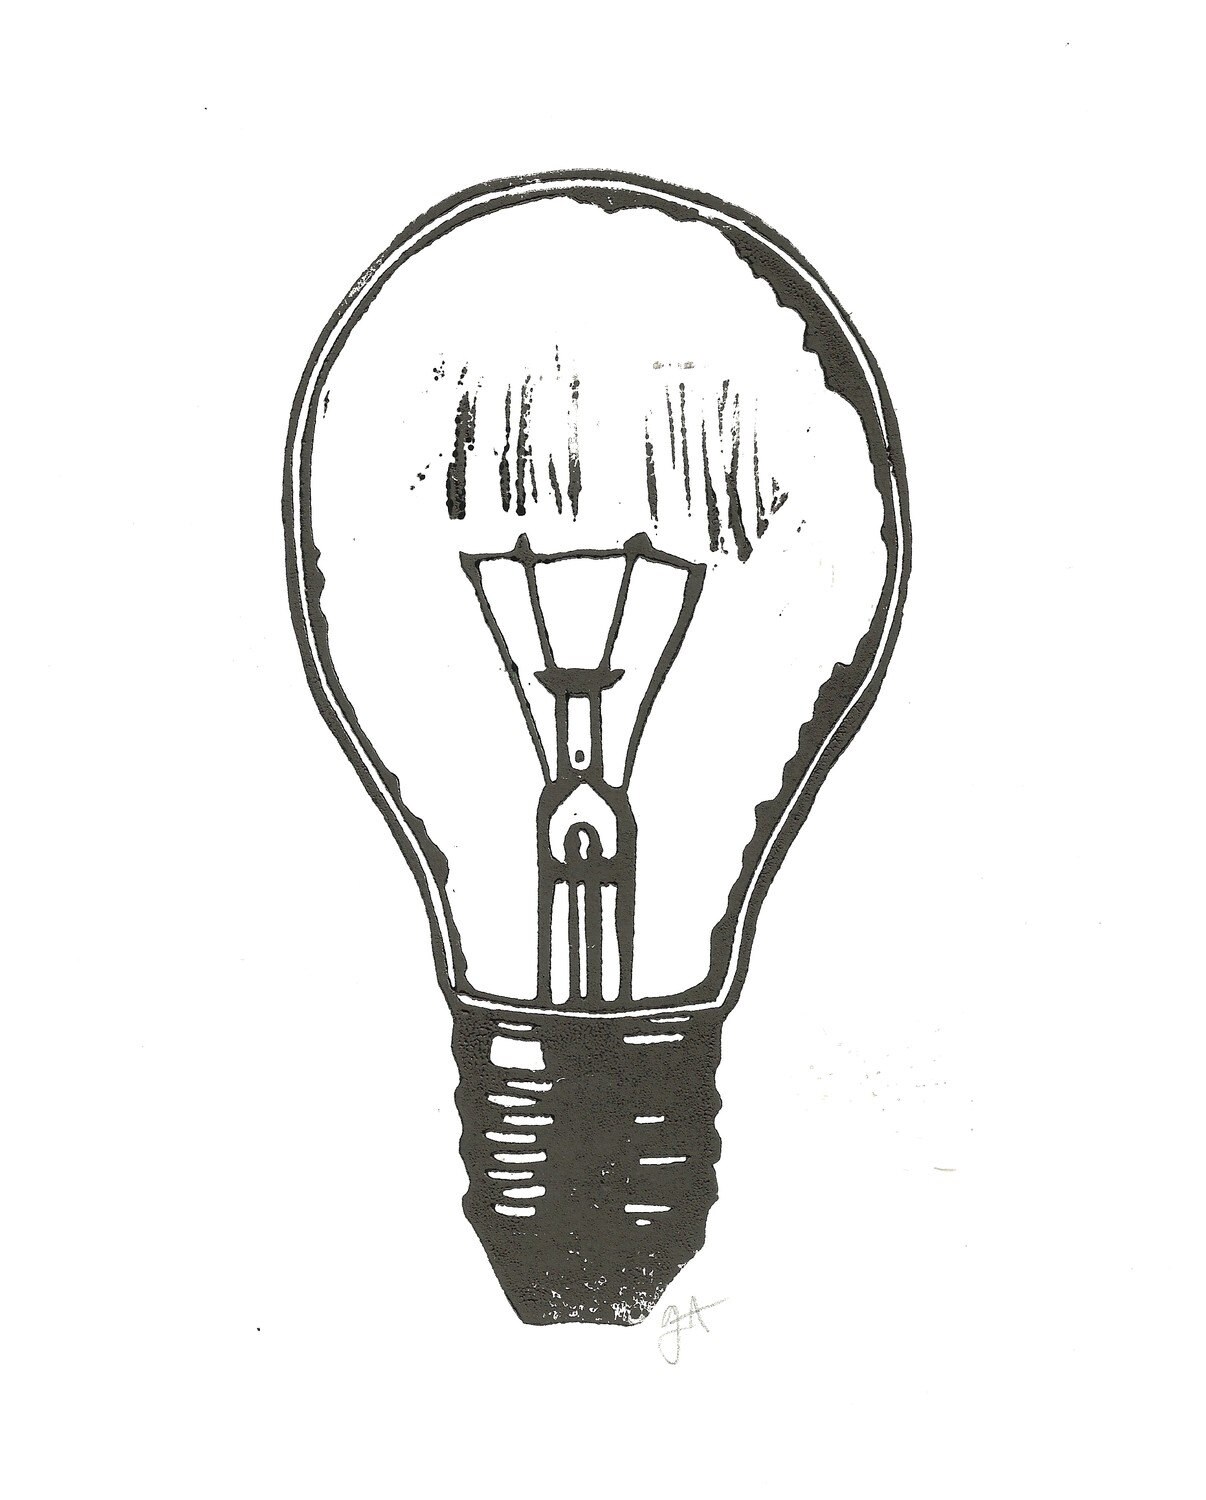
Which Art Print Should Start My Collection?

 {source}
These block prints are available at PerlaAnne's Shop. Thanks to Kate from DomestiKated Life for letting me know about this fabulous shop!


Monday, March 21, 2011
Dreaming of...


...using some big letters in freshening up the household decor. I've almost made the purchase a couple different times, but I haven't committed yet. I really like the homage to LA from coco & kelly, I'm thinking I'd like make an homage to the bay... I also love the giant N used by Restored Style.
 {source}
...remembering things. A lot has been slipping my mind lately. Better go back to making lists... lots of lists. Not so bad when you love making lists... {source}
... fresh flowers back in our home. I already have been indulging in tulips at the farmers' market.


Hope your Monday got your week off to a good start!
Friday, March 18, 2011
A little unexpected gift...

So a big smile spread across my face when I received an award from the lovely Bee at on a whim... Thank you so much, it totally made my day.
These are the rules:
These are the rules:
1. Thank the person who gave you the award
2. Share 7 things about yourself
3. Pass the award to up to 10 versatile bloggers
4. Let those bloggers know that you gave them the award
So lets see...seven things about me...
1. I broke a window with my head trying to get my mom's attention when I was little. My husband says that is telling of my personality. Hmmm....
2. Although I have not yet completed a quilt, I have 5 quilts in the works... and... bought fabric for two more at a recent quilt show.
3. I play ice hockey.
4. When I was in middle school I collected X-Men comic books. I still love Marvel.
5. I love taking old items and giving them a new twist.
6. I am terrified of needles.
7. When I was little my mom told me that all my freckles were kisses from the sun and I told her that the sun must really love me.

And the award goes to...
Undeniable Style
City Bird's Nest
better than bland
DomestiKated Life
I love your blogs...
3. Pass the award to up to 10 versatile bloggers
4. Let those bloggers know that you gave them the award
So lets see...seven things about me...
1. I broke a window with my head trying to get my mom's attention when I was little. My husband says that is telling of my personality. Hmmm....
2. Although I have not yet completed a quilt, I have 5 quilts in the works... and... bought fabric for two more at a recent quilt show.
3. I play ice hockey.
4. When I was in middle school I collected X-Men comic books. I still love Marvel.
5. I love taking old items and giving them a new twist.
6. I am terrified of needles.
7. When I was little my mom told me that all my freckles were kisses from the sun and I told her that the sun must really love me.
And the award goes to...
Undeniable Style
City Bird's Nest
better than bland
DomestiKated Life
I love your blogs...
Thursday, March 17, 2011
DIY: Owl Pillow

The pillow remix continues. Here is another piece that is transforming the living room.
MATERIALS:
Freezer Paper
Solid Color Fabric
Patterned Fabric
Thread
Fiber Fill (or any material to stuff your pillow)
Craft Knife
Pencil
Iron
Paint
Paintbrush
Sewing Pins
Needle/Sewing Machine
Scissors
STEP 1: Draw
Sketch a silhouette onto your freezer paper. Be sure to sketch your image on the matte side of the paper. I loved this pillow from Urban Outfitters and clearly used it to hand draw my own owl. I put exes on the parts of my drawing that I knew I would be ironing onto my fabric.
STEP 2: Cut
Use a craft knife to cut out your image. My favorite craft knife is the Fiskars Fingertip Craft Knife. It gives you complete control. If you are careful as you cut you will end up with two sets of freezer paper stencils you can use for two different projects. Be sure to cut on a surface that will not be damaged by the knife.

STEP 3: Iron
Place your pieces carefully on your fabric on an ironing surface with the shiny side of the paper facing down. If your image is like mine, you will have more than one piece of freezer paper in your stencil. Once everything is laid out, iron on your image. Be sure that your iron is making direct content only with the matte side of the freezer paper.


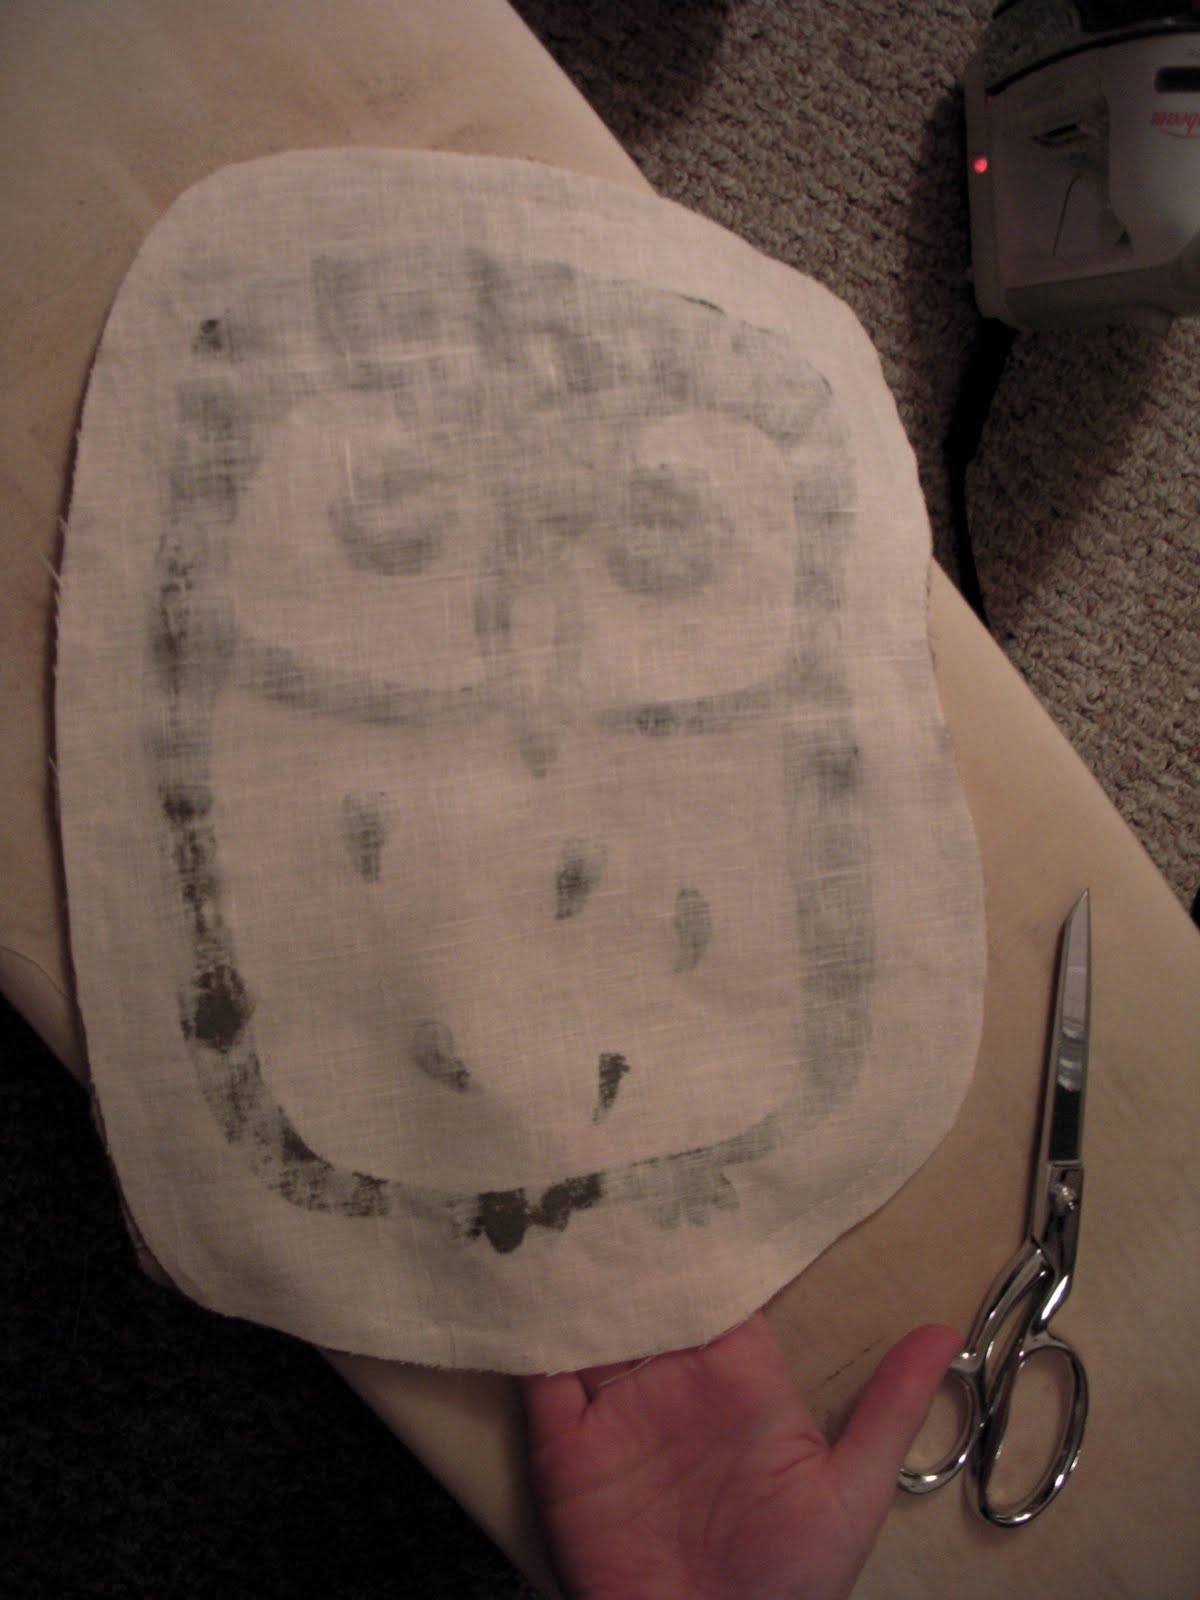
STEP 4: Paint
Using whatever color you choose, paint the entire area of the stencil. I mixed a couple colors to create the gray that I wanted. Minimize your brushstrokes as to not dislodge the freezer paper. Let the paint dry.


STEP 5: Peel
Slowly peel off the freezer paper. It doesn't matter if it rips, these stencils can only be used once.


STEP 6: Cut Fabric
Now that you have your image, cut out the shape you want your pillow to be. Be sure to leave an additional 0.25 inch seam allowance around the edge. Pin your painted fabric to the backing fabric with right sides together and cut. This should result in two pieces of fabric that are mirror images of each other.


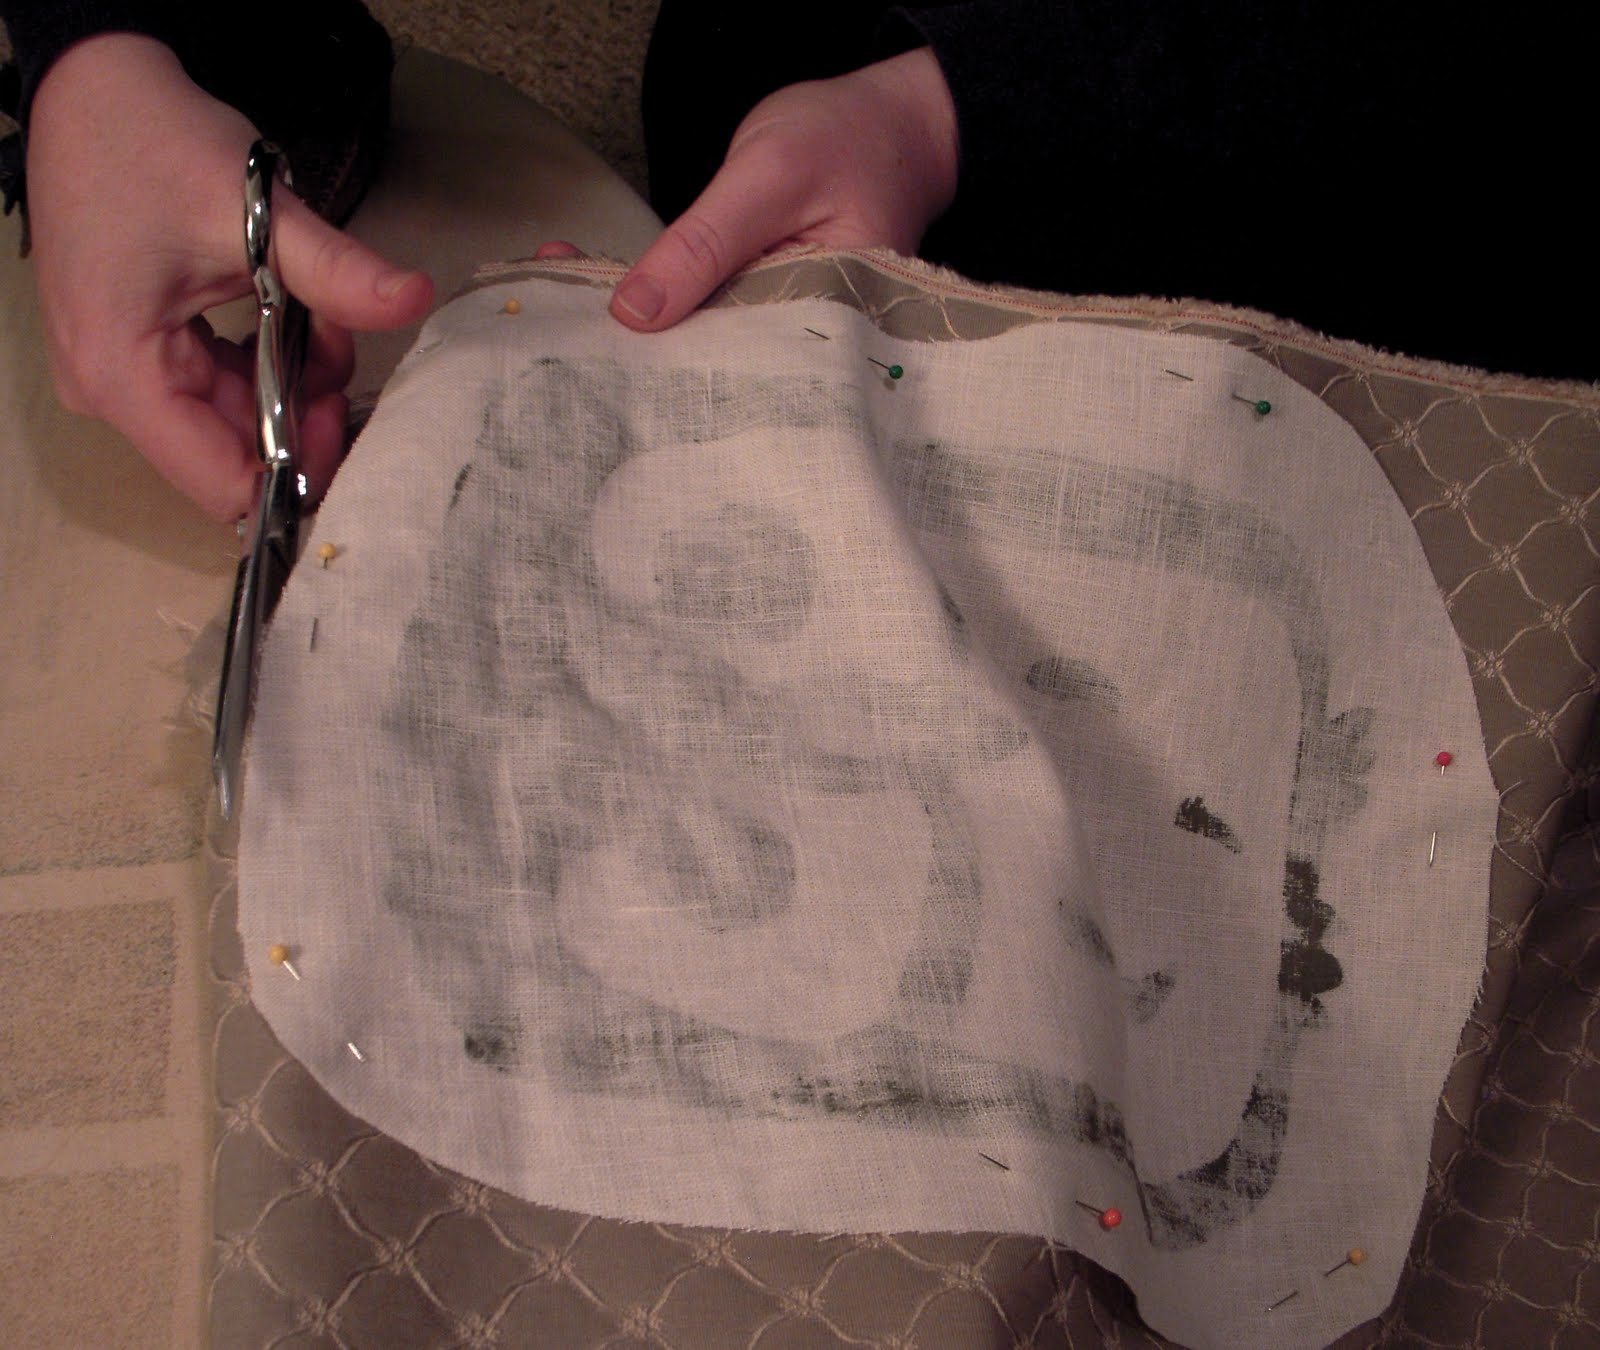
STEP 7: Sew
With right sides together, sew around the edge of your pillow. Leave a 2-3 inch opening so that you can turn it right-side out. I use pins to mark where to start sewing and where to stop sewing.
STEP 8: Reverse and Stuff
Turn your pillow right-side out and stuff with your pillow filling.

STEP 9: Close it up!
Pin and stitch your pillow closed. Throw it on a couch, chair, or bed to add a little homemade pizazz to your humble abode!


Happy sewing!
Monday, March 14, 2011
Dreaming of...
...sleeping in a human size nest. I kid you not. It was built by Big Sur artist Jayson Fann and can be reserved at the Tree Bones Resort. This is definitely making the before thirty list.
...getting my closet organized. I know this is a bit of a reoccurring theme, but it is a reality that confronts me everyday... something must be done!
...this might be cheating a little bit. My goal for this blog of mine is to dream of the things that I can make happen now... However I can't help but do a little real estate peek every now and again. I think this place is a lil' dreamy. Big backyard. Only down side is that it is RIGHT next to the freeway.
...making something with these. They would make an incredible garland! Little pricey, but they have me inspired.
...taking a mental health day. I have been going and going and going and last time I checked I was not the Energizer Bunny... unfortunately. I need a day, some time for lil' ol' me.


...getting my closet organized. I know this is a bit of a reoccurring theme, but it is a reality that confronts me everyday... something must be done!

...this might be cheating a little bit. My goal for this blog of mine is to dream of the things that I can make happen now... However I can't help but do a little real estate peek every now and again. I think this place is a lil' dreamy. Big backyard. Only down side is that it is RIGHT next to the freeway.
...making something with these. They would make an incredible garland! Little pricey, but they have me inspired.
...taking a mental health day. I have been going and going and going and last time I checked I was not the Energizer Bunny... unfortunately. I need a day, some time for lil' ol' me.
Hope your week is getting off to a great start!
What are you dreaming of on this lovely Monday?
What are you dreaming of on this lovely Monday?
Monday, March 7, 2011
30 for 30 in Review


LESSONS LEARNED:
- I am a fan of a high waist.
- Belts are my friend.
- Layering can make an outfit stand out.
- Cowls make me happy and cozy.
- Mixing patterns can work.
- I like how it looks when you belt a cardigan, who knew!
SHOPPING LIST:
- Skinny belts
- More dynamic shoes (that are still comfortable)
- Some simple cardigans
- Chunky necklaces
Subscribe to:
Posts (Atom)